vrijdag 28 augustus 2015

Randomness....! Is random the same as random?

Often I need a random number (as a seed for a split, or to randomly order records). Now you might think that,  if we have a randomnumber generator, you could make things MORE random if you multiply these (random * random is randomer). Let's see if this holds true by just trying! 
Say we have 20,000 random numbers between 0 and 1 we can plot the number against their frequency using a histogram (100 bins):


Now this looks pretty random, 100 bins means that the space is divided in 100 sections. So 1 bin (section) with all values between 0.00 - 0.01 , 1 bin with all values between 0.01-0.02. 

We observe that most bins have a value between 0.009 & 0.011 and all between 0.008 & 0.012. which means that there are about 0.010 * 20,000 = +/- 200 points generated with a value between 0 and 0.01. 

There are also 200 point generated with a value between 0.01 and 0.02 and so on. This indeed looks rather random.  We can also plot the index (1st number generated to 20,000th number generated) versus the value:


Again this looks al pretty random, and so it should. The whole space is filled evenly.

Now here comes the kicker: If we multiply these random numbers (the same in the same order) with another random number things start to look less random:


Again we can plot the index versus the number:


What we see is that the numbers are actually getting less random. So a given value occurs more frequently. Now let's look at the bin plot again:


Remember just now, there were approximately 200 points with a value between 0.00 and 0.01. Now we see 0.06 * 20,000 = 1200, conversely we see only 0.00005 * 20,000 = 1 datapoint with a value between 0.99 and 1.00! This is looking much less random. 

And this effects gets worse when we use 3 times random numbers multiplied:


0.165 * 20,000 = 3310 values between 0.00 - 0.01  and 0 values between 0.99 - 1.00. The highest bin is between 0.89 and 0.90 with 0.0001 * 20,000 = 2 data points. 


And 4 times random numbers multiplied…


0.33030 * 20,000 = 6606 values between 0.00 and 0.01 & again 0 in the highest bin. There is 0.00005 * 20,000 = 1 datapoint with a value between 0.86 and 0.87. (perhaps not very visible in the second plot)


So there you have it, while you might think that random * random is more random than random, it is NOT! This is stated by the central limit theorem. In probability theory, the central limit theorem (CLT) states that, given certain conditions, the arithmetic mean of a sufficiently large number of iterates of independent random variables, each with a well-defined expected value and well-defined variance (all will be between 0 and 1), will be approximately normally distributed, regardless of the underlying distribution. (see [1] http://www.math.uah.edu/stat/sample/CLT.html, [2] Rice, John (1995), Mathematical Statistics and Data Analysis (Second ed.), Duxbury Press, ISBN 0-534-20934-3), also [3] wikipedia, https://en.wikipedia.org/wiki/Central_limit_theorem )

dinsdag 4 augustus 2015

Fix WIFI issues in OS X Yosemite

OS X (in particular Yosemite) is not known for it's reliable wifi connections. There are a number of solutions posted over the internet (see below) which I have not tried. However, if you, like me, have wifi issues after installing a recent os x update this might be a solution. The problem is that the update renames (backups) the discoveryd.plist file without installing a new one. Simple workaround (maintaing the backup and renaming the _bc to original):
- cd /System/Library/LaunchDaemons/
- sudo cp com.apple.discoveryd_bc.plist com.apple.discoveryd_bc2.plist
- sudo mv com.apple.discoveryd_bc.plist com.apple.discoveryd.plist
- sudo reboot

Here are some mroe fixes from OS X Daily (have not tried / needed those myself).
Original article can be found here : http://osxdaily.com/2014/10/25/fix-wi-fi-problems-os-x-yosemite/


1: Remove Network Configuration & Preference Files

Manually trashing the network plist files should be your first line of troubleshooting. This is one of those tricks that consistently resolves even the most stubborn wireless problems on Macs of nearly any OS X version. This is particularly effective for Macs who updated to Yosemite that may have a corrupt or dysfunctional preference file mucking things up:
  1. Turn Off Wi-Fi from the Wireless menu item
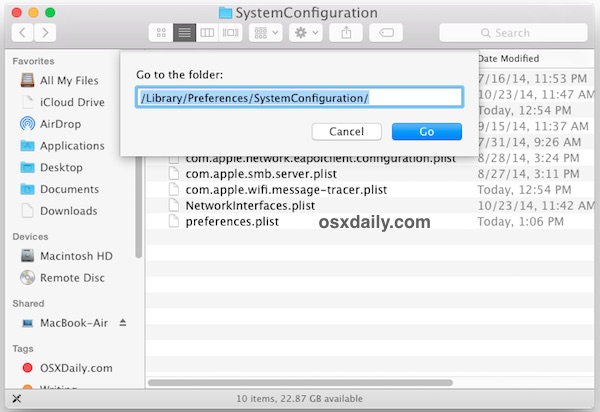
  2. From the OS X Finder, hit Command+Shift+G and enter the following path:
  3. /Library/Preferences/SystemConfiguration/
    trash-network-configuration-settings-os-x-yosemite-wifi
  4. Within this folder locate and select the following files:
  5. com.apple.airport.preferences.plist
    
com.apple.network.identification.plist
    com.apple.wifi.message-tracer.plist

    NetworkInterfaces.plist

    preferences.plist
  6. Move all of these files into a folder on your Desktop called ‘wifi backups’ or something similar – we’re backing these up just in case you break something but if you regularly backup your Mac you can just delete the files instead since you could restore from Time Machine if need be
  7. Reboot the Mac
  8. Turn ON WI-Fi from the wireless network menu again
This forces OS X to recreate all network configuration files. This alone may resolve your problems, but if you’re continuing to have trouble we recommend following through with the second step which means using some custom network settings.

2: Create a New Wi-Fi Network Location with Custom DNS

What we’re doing here is creating a new network location which is going to have a configuration different from the defaults. First, we’ll use a completely new network setup. Then, we’ll set DNS on the computer rather than waiting for OS X to get DNS details from the wi-fi router, which alone can resolve many issues with DNS lookups, since Yosemite seems to be finicky with some routers. Finally, we’re going to set a custom MTU size that is slightly smaller than the default, which will get rejected less often by a router, it’s an old netadmin trick that has long been used to fix network troubles.
  1. Open the  Apple menu and go to System Preferences, then choose “Network”
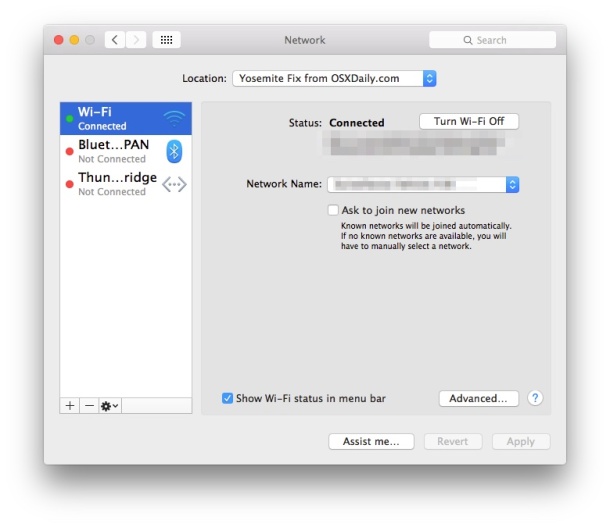
  2. Pull down the “Locations” menu and choose “Edit Locations”, then click the [+] plus button, give the new network location a name like “Yosemite WiFi” then click Done
  3. connected-wifi-network-osx-yosemite
  4. Next to “Network Name” join your desired wifi network as usual
  5. Now click the “Advanced” button, and go to the “DNS” tab
  6. Click the [+] plus button and specify a DNS server – we’re using 8.8.8.8 for Google DNS in this example but you should use the fastest DNS servers you can find for your location, it will vary. You can also use your own ISP DNS servers
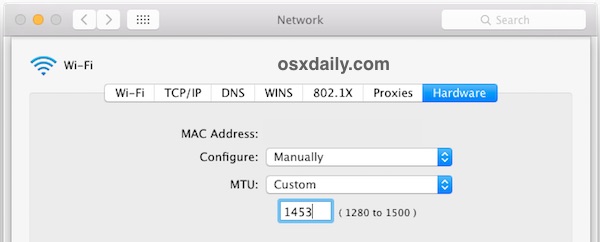
  7. Now go to the “Hardware” tab and click on ‘Configure’ and choose “Manually”
  8. Click on MTU and change it to “Custom” and set the MTU number to 1453 (this is a networking secret from ancient times, and yes it still works!), then click on “OK”
  9. custom-mtu-setting-wifi
  10. Now click on “Apply” to set your network changes
Quit and relaunch any apps that require network access, like Safari, Chrome, Messages, Mail, and your wireless connectivity should be flawless and back at full speed at this point.

Reset SMC

Some users report that resetting the System Management Controller is sufficient to stir their Wi-Fi back into action. Since many users have a MacBook laptop, that’s what we’ll cover first:
  • Turn off the MacBook Air or MacBook Pro
  • Connect the power adapter to the Mac as usual
  • On the keyboard, press and hold down the Shift+Control+Option keys and the Power button at the same time, hold them all for a few seconds
  • Release all keys and the power button at the same time by lifting your hands away from the keyboard
  • Boot the Mac as usual
You can read more about resetting SMC here and here for other Macs, including for the iMac and Mac Mini.

Unload & Reload discoveryd to Fix DNS & Wi-Fi Failures in OS X Yosemite

Another trick that was left in the comments (thanks Frank!) involves refreshing the discoveryd service by unloading and reloading it with the launchctl command. This is a bit curious but apparently it works for some users, suggesting there could be an issue with discovery or resolving DNS on some Yosemite Macs. It’s certainly worth a try if the above tricks failed to resolve your wi-fi connectivity problems in OS X 10.10, as there are a fair amount of positive reports with this one:
  1. Open Terminal (found in /Applications/Utilities/ or with Spotlight) and enter the following command:
  2. sudo launchctl unload -w /System/Library/LaunchDaemons/com.apple.discoveryd.plist
  3. Hit return and enter an admin password to use the sudo command
  4. Now run the following command to reload discoveryd (this used to be called mDNSResponder)
  5. sudo launchctl load -w /System/Library/LaunchDaemons/com.apple.discoveryd.plist
  6. Again hit Return to finish the command
You may need to relaunch apps that require network connectivity. Note that if you reboot the Mac with this one, you will have to repeat the above steps to unload and reload discoveryd into launchd.

Bonus OS X Yosemite Wi-Fi Troubleshooting Tricks

Here are some other less than ideal solutions that have been reported to remedy wi-fi issues in OS X Yosemite.
  • Join a 2.4GHZ network (N network) – some users report no trouble with 2.4GHz networks
  • Set the wi-fi routers 5GHz (G) channel to be somewhere between 50-120
  • Turn Off Bluetooth – We have seen several reports that disabling Bluetooth will resolve wifi problems with some networks, but this is obviously not appropriate for Macs that have bluetooth accessories
If none of the above works, there could be other problems. Sometimes starting fresh with a clean install could resolve them, or if you believe the problem to be a bug and you had a trouble free experience in prior versions of Mac OS, you could always downgrade from OS X Yosemite to Mavericks again until an update to Yosemite arrives to resolve the issue once and for all.
Have you experienced wireless connectivity issues with OS X Yosemite? What have you tried, and how did you resolve them? Let us know what has been working to remedy your wifi troubles by leaving a comment!

zaterdag 30 augustus 2014

Part V: ZFS - Poor man's deduplication - Howto: Ubuntu Home Server (ZFS + virtual IpFire)


Series : Ubuntu Home Server (ZFS + virtual IpFire) 

Part IV: How much space do you lose with a RaidZ1/RaidZ2/RaidZ3?
-->Part V : Poor man's deduplication  (this post)<--


Poor man's deduplication..

Table of Contents:

Why deduplication?
How to check for duplicate files
Processing and sorting your list
Consolidating directories
Removing duplicates


Why deduplication?

I use our ZFS server / NAS mostly for backup and network storage. As I am working in cheminformatics my job produces a lot of data, supervising students add to this.. Much of this data and old files need to be stored (in particular if you have published on this data, it needs to be reproducible). I like to think I am pretty organised in the way I store data, but turns out I am not.... I work from home sometimes, do work om my workstation at work, sometimes on a laptop (used to make backups on external drives in the pre-zfs era). 

When I installed my NAS I consciously turned off deduplication for two reasons, firstly the server hardware was likely not powerful enough (X3 with 16GB RAM). Secondly because I thought I did not need it (convinced that my file system was well organised...)

However ZFS showed that I had a number of duplicate blocks.. In fact the output from zdb -S showed that I could in theory obtain a 1.1 reduction (or 9%) by deduplication. The output is listed here:

root@KarelDoorman:~# zdb -S zfspool
Simulated DDT histogram:

bucket              allocated                       referenced          
______   ______________________________   ______________________________
refcnt   blocks   LSIZE   PSIZE   DSIZE   blocks   LSIZE   PSIZE   DSIZE
------   ------   -----   -----   -----   ------   -----   -----   -----
     1    35.7M   4.43T   4.13T   4.15T    35.7M   4.43T   4.13T   4.15T
     2    2.70M    333G    274G    278G    5.80M    717G    589G    597G
     4     275K   30.7G   23.6G   24.3G    1.29M    146G    113G    116G
     8    32.4K   3.39G   2.66G   2.74G     317K   33.0G   26.2G   27.0G
    16    4.02K    254M    207M    224M    81.7K   4.86G   3.94G   4.28G
    32      913   16.9M   9.36M   15.1M    40.1K    685M    365M    625M
    64       59   1.49M    590K    975K    4.83K    124M   46.0M   77.5M
   128       18    574K     15K    144K    3.28K    117M   2.72M   26.2M
   256        6    390K   4.50K   48.0K    2.01K    151M   1.58M   16.0M
   512        5    258K      4K   40.0K    4.10K    151M   3.12M   32.8M
    1K        4    257K      3K   32.0K    5.52K    379M   4.24M   44.1M
    2K        2      1K      1K   16.0K    5.18K   2.59M   2.59M   41.4M
    8K        1    128K      1K   7.99K    10.1K   1.27G   10.1M   81.0M
   16K        1    128K      1K   7.99K    25.8K   3.22G   25.8M    206M
 Total    38.7M   4.79T   4.42T   4.44T    43.3M   5.32T   4.85T   4.87T

dedup = 1.10, compress = 1.10, copies = 1.01, dedup * compress / copies = 1.20

However, this also shows that there are in total 38.7 million unique blocks in my file system, which would require 38.7 million * 320 bytes ~ 11.5 GB of RAM for just the dedup table (requiring in total 4 times that as ARC should be limited to 25 %, so 48 GB).

Now at the current prices (Tweaker.net) this costs about 800 EUR! Corresponding to 5.7 disks of 2TB. So it seems to me that deduplication in ZFS is out of my budget. Hence, poor man's (manual) deduplication.

If you're interested, this is what it looks like graphically (note the logarithmic y scale):

This shows that there are 35,700,000 blocks that are unique, 2,700,000 that exist in duplicate, 27,5000 that exist in triplicate, etc. It even shows that there is a single block present in 16,000 fold. So hence I thought I'd try to do this on the file level, maybe there was something to gain. 


How to check for duplicate files? 

Checking for duplicates can be rather tedious. Files can be named differently, have different timestamps etc. For this a brilliant program has been written : Fdupes. Github page : https://github.com/adrianlopezroche/fdupes. It even has it's own wikipedia page: http://en.wikipedia.org/wiki/Fdupes

"The program first compares file size and MD5 signatures and then performs a byte-by-byte check for verification." 

So you can be rather sure that a duplicate is an actual duplicate. I ran this on my /zfspool folder (which is the root folder of all zfs datasets. In total about 1.7 million files are stored on my zfs pool (taking up approximately 5 TB of space). The results were as follows (note that I processed and grouped the output using pipelining tools (e.g. KNIME or Pipeline Pilot):


So it turns out that of the 1.7 million files about 665692 were duplicates taking up 893.51 Gigabytes!

so much for an organised file system as the majority of these duplicates were actually in my work folder....

Processing and sorting your list

By default fdupes outputs the duplicates with their full location, this can be ported to a text file and then the files are sorted with blank lines separating the groups. 

Now I wanted to easily gain a lot os space and hence I wanted to start with the largest files, moreover I wanted a uniqie identifier per files to browse through. So using two simple bash scripts I did the following:
1 removed the empty lines 

#!/bin/sh
files="/media/dupes/duplicates.txt"
for i in $files
do
  sed '/^$/d' $i > duplicates_out.txt
done


2 for each file calculate the MD5 hash 9also because I am paranoid) and add the size in bytes (for later sorting)

#!/bin/sh
while read name
do
hash=`md5sum "$name" | awk '{print $1}'`
size=`ls -all "$name" | awk '{print $5}'`
echo -e  "$name\t$hash\t$size"
done

Afterward you get a file that lists 3 columns seperated by tabs: name, hash, size (bytes).

Using Pipeline pilot I created a unique ID (hash_size), calculated the size in MB / GB, and calculated first occurences for each ID. (protocol is available HERE, but this can easily be done with KNIME). 

Consolidating directories

From this I observed several directories to be duplicate from other directories, with Rsync you can easily merge them (I used timestamps and kept a log).

rsync -avhP /directory1/ /directory2/ > /loggind_dir/transferlogs/1.txt

Removing duplicates

After this I repeated fdupes and the processing and deleted the remaining duplicates. In total I freed about 700 GB!


zondag 24 augustus 2014

Part III : ZFS - Scripts - Howto: Ubuntu Home Server (ZFS + virtual IpFire)

Setting up hardware monitoring and webmin 

Table of Contents:

Why hardware monitoring
CPU & Chipset temperature + fanspeed
HDD temperature
SMART monitoring
ZFS Health monitoring
Scheduling via CRON
Management via the browser


Why hardware monitoring

Current consumer electronics are equipped with a number of hardware monitoring sensors. Given that this server will be running 24/7 and will be hosting some of my most important data, I would like to have the piece of mind that nothing will go wrong. Moreover, Linux provides us with the excellent functionality of sending an email upon disk failure, hardware failure, etc.

CPU & Chipset temperature + fanspeed

CPU and chipset are monitored by LM-sensors. Webmin (which we will use for our combined interface) also supports these. Installation is easy :

sudo apt-get install lm-sensors

HDD temperature

HDD temp can be monitored via the hdd temp deamon install is again easy:

sudo apt-get install hddtemp

Automatically reading sensors

Both sensors and hdd temp are automagically read every hour by a cron job using the script below. Name the script eg. sensor-reading.sh and place in ' /usr/sbin ' . chmod +x so it is executable. The results are written to a file in the zfspool

#!/bin/sh
#script by Gertdus
echo `date +"%H_%M_%d_%m_%Y"`

cd /zfspool/ServerLogs

DIR=`date +"%Y_%m_%d"`
FILENAME=`date +"%H_%M"`

echo "$FILENAME"
echo "$DIR"

mkdir $DIR

cd $DIR

date > $FILENAME

sensors >> $FILENAME
hddtemp /dev/sda >> $FILENAME
hddtemp /dev/sdb >> $FILENAME
hddtemp /dev/sdc >> $FILENAME
hddtemp /dev/sdd >> $FILENAME
hddtemp /dev/sde >> $FILENAME
hddtemp /dev/sdf >> $FILENAME
hddtemp /dev/sdg >> $FILENAME
hddtemp /dev/sdh >> $FILENAME

mv $FILENAME $FILENAME.txt

SMART monitoring

Finally, smart info is monitored via smartmontools, again install:

sudo apt-get install smartmontools

I use a daily and monthly script. Daily read out and monthly short test + read out. Results are written to a log file in the zfs pool  ('/zfspool/serverlogs/')

Daily script, name eg. smart-test.sh and place in ' /usr/sbin ' . chmod +x so it is executable.

# Script by Meliorator. irc://irc.freenode.net/Meliorator
# modified by Ranpha and Gertdus


cd /zfspool/ServerLogs


DIR=`date +"%Y_%m_%d"`
FILENAME=SMART
echo "$FILENAME"
echo "$DIR"


mkdir $DIR
cd $DIR
mkdir smart-logs


smartctl -a /dev/sda >> smart-logs/smart-sda.log
smartctl -a /dev/sdb >> smart-logs/smart-sdb.log
smartctl -a /dev/sdc >> smart-logs/smart-sdc.log
smartctl -a /dev/sdd >> smart-logs/smart-sdd.log
smartctl -a /dev/sde >> smart-logs/smart-sde.log
smartctl -a /dev/sdf >> smart-logs/smart-sdf.log
smartctl -a /dev/sdg >> smart-logs/smart-sdg.log
smartctl -a /dev/sdh >> smart-logs/smart-sdh.log


and the monthly script, name eg. smart-test_monthly.sh and place in ' /usr/sbin ' . chmod +x so it is executable.


# Script by Meliorator. irc://irc.freenode.net/Meliorator
# modified by Ranpha and Gertdus


cd /zfspool/ServerLogs


DIR=`date +"%Y_%m_%d"`
FILENAME=SMART
echo "$FILENAME"
echo "$DIR"


mkdir $DIR
cd $DIR
mkdir smart-logs


smartctl -H -l selftest -f -d -m root ata /dev/sda >> smart-logs/smart-sda.log
sleep 5
smartctl -H -l selftest -f -d -m root ata /dev/sdb >> smart-logs/smart-sdb.log
sleep 5
smartctl -H -l selftest -f -d -m root ata /dev/sdc >> smart-logs/smart-sdc.log
sleep 5
smartctl -H -l selftest -f -d -m root ata /dev/sdd >> smart-logs/smart-sdd.log
sleep 5
smartctl -H -l selftest -f -d -m root ata /dev/sde >> smart-logs/smart-sde.log
sleep 5
smartctl -H -l selftest -f -d -m root ata /dev/sdf >> smart-logs/smart-sdf.log
sleep 5
smartctl -H -l selftest -f -d -m root ata /dev/sdg >> smart-logs/smart-sdg.log
sleep 5
smartctl -H -l selftest -f -d -m root ata /dev/sdh >> smart-logs/smart-sdh.log
sleep 5


smartctl -a /dev/sda >> smart-logs/smart-sda.log
smartctl -a /dev/sdb >> smart-logs/smart-sdb.log
smartctl -a /dev/sdc >> smart-logs/smart-sdc.log
smartctl -a /dev/sdd >> smart-logs/smart-sdd.log
smartctl -a /dev/sde >> smart-logs/smart-sde.log
smartctl -a /dev/sdf >> smart-logs/smart-sdf.log
smartctl -a /dev/sdg >> smart-logs/smart-sdg.log
smartctl -a /dev/sdh >> smart-logs/smart-sdh.log


ZFS Health monitoring

ZFS health is monitored by the script from calomel.org. However I have added the change that if all is well, an email is sent saying all is well.

Name the script eg. zfs-health.sh and place in ' /usr/sbin ' . chmod +x so it is executable.

#! /bin/bash
#
# Calomel.org
#     https://calomel.org/zfs_health_check_script.html
#     FreeBSD 9.1 ZFS Health Check script
#     zfs_health.sh @ Version 0.15


# Check health of ZFS volumes and drives. On any faults send email. In FreeBSD
# 10 there is supposed to be a ZFSd daemon to monitor the health of the ZFS
# pools. For now, in FreeBSD 9, we will make our own checks and run this script
# through cron a few times a day.


# 99 problems but ZFS aint one
problems=0


# Health - Check if all zfs volumes are in good condition. We are looking for
# any keyword signifying a degraded or broken array.


condition=$(/sbin/zpool status | egrep -i '(DEGRADED|FAULTED|OFFLINE|UNAVAIL|REMOVED|FAIL|DESTROYED|corrupt|cannot|unrecover)')
if [ "${condition}" ]; then
       emailSubject="`hostname` - ZFS pool - HEALTH fault"
       problems=1
fi


# Capacity - Make sure pool capacities are below 80% for best performance. The
# percentage really depends on how large your volume is. If you have a 128GB
# SSD then 80% is reasonable. If you have a 60TB raid-z2 array then you can
# probably set the warning closer to 95%.
#
# ZFS uses a copy-on-write scheme. The file system writes new data to
# sequential free blocks first and when the uberblock has been updated the new
# inode pointers become valid. This method is true only when the pool has
# enough free sequential blocks. If the pool is at capacity and space limited,
# ZFS will be have to randomly write blocks. This means ZFS can not create an
# optimal set of sequential writes and write performance is severely impacted.


maxCapacity=80


if [ ${problems} -eq 0 ]; then
  capacity=$(/sbin/zpool list -H -o capacity)
  for line in ${capacity//%/}
    do
      if [ $line -ge $maxCapacity ]; then
        emailSubject="`hostname` - ZFS pool - Capacity Exceeded"
        problems=1
      fi
    done
fi


# Errors - Check the columns for READ, WRITE and CKSUM (checksum) drive errors
# on all volumes and all drives using "zpool status". If any non-zero errors
# are reported an email will be sent out. You should then look to replace the
# faulty drive and run "zpool scrub" on the affected volume after resilvering.


if [ ${problems} -eq 0 ]; then
  errors=$(/sbin/zpool status | grep ONLINE | grep -v state | awk '{print $3 $4 $5}' | grep -v 000)
  if [ "${errors}" ]; then
       emailSubject="`hostname` - ZFS pool - Drive Errors"
       problems=1
  fi
fi


# Scrub Expired - Check if all volumes have been scrubbed in at least the last
# 8 days. The general guide is to scrub volumes on desktop quality drives once
# a week and volumes on enterprise class drives once a month. You can always
# use cron to schedule "zpool scrub" in off hours. We scrub our volumes every
# Sunday morning for example.
#
# Scrubbing traverses all the data in the pool once and verifies all blocks can
# be read. Scrubbing proceeds as fast as the devices allows, though the
# priority of any I/O remains below that of normal calls. This operation might
# negatively impact performance, but the file system will remain usable and
# responsive while scrubbing occurs. To initiate an explicit scrub, use the
# "zpool scrub" command.
#
# The scrubExpire variable is in seconds. So for 8 days we calculate 8 days
# times 24 hours times 3600 seconds to equal 691200 seconds.
#30days


scrubExpire=2592000


if [ ${problems} -eq 0 ]; then
  currentDate=$(date +%s)
  zfsVolumes=$(/sbin/zpool list -H -o name)


 for volume in ${zfsVolumes}
  do
   if [ $(/sbin/zpool status $volume | egrep -c "none requested") -ge 1 ]; then
       echo "ERROR: You need to run \"zpool scrub $volume\" before this script can monitor the scrub expiration time."
       break
   fi
   if [ $(/sbin/zpool status $volume | egrep -c "scrub in progress|resilver") -ge 1 ]; then
       break
   fi


   ### FreeBSD with *nix supported date format
    #scrubRawDate=$(/sbin/zpool status $volume | grep scrub | awk '{print $15 $12 $13}')
    #scrubDate=$(date -j -f '%Y%b%e-%H%M%S' $scrubRawDate'-000000' +%s)


   ### Ubuntu with GNU supported date format
   scrubRawDate=$(/sbin/zpool status $volume | grep scrub | awk '{print $11" "$12" " $13" " $14" "$15}')
   scrubDate=$(date -d "$scrubRawDate" +%s)


      if [ $(($currentDate - $scrubDate)) -ge $scrubExpire ]; then
       emailSubject="`hostname` - ZFS pool - Scrub Time Expired. Scrub Needed on $volume"
       problems=1
      fi
  done
fi


# Notifications - On any problems send email with drive status information and
# capacities including a helpful subject line to root. Also use logger to write
# the email subject to the local logs. This is the place you may want to put
# any other notifications like:
#
# + Update an anonymous twitter account with your ZFS status (https://twitter.com/zfsmonitor)
# + Playing a sound file or beep the internal speaker
# + Update Nagios, Cacti, Zabbix, Munin or even BigBrother


if [ "$problems" -ne 0 ]; then
 echo -e "$emailSubject \n\n\n `/sbin/zpool list` \n\n\n `/sbin/zpool status`" | mail -s "$emailSubject" root
 logger $emailSubject
fi


if [ "$problems" -eq 0 ]; then
 echo "ZFS Healthy"
fi


### EOF ###


Scheduling via CRON

Now simply add these scripts to the crontab so they are automagically executed. If you have used the names above :

sudo leafpad /etc/crontab

# m h dom mon dow user command
29 * * * * root /usr/sbin/zfs-health.sh
30 20 * * * root /usr/sbin/smart-test.sh
31 * * * * root /usr/sbin/sensor-reading.sh
32 20 13 * * root /usr/sbin/smart-test_monthly.sh

Columns indicate
Minute Hour Day Month Day-ofWeek , if * is annotated it is done every minute /hour /etc.

Here zfs health is read every hour at minute x.29 (column 1), and sensors at minute x.31.
Smart read is done daily at 20.30, and smart test monthly on the 13th @ 20.32.

Emailing via postfix

If you have not done so, set up postfix. I have forwarded the root email to my own email for convenience. This way you will receive an email when the cronjob is executed.


echo "bla@domain.com" > /root/.forward

Test postfix


sudo sendmail bla@domain.com
blabla
.

Test postfix
telnet localhost 25
ehlo localhost
mail from: root@localhost
rcpt to: root@localhost
data
Subject: My first mail on Postfix

Hi,
Are you there?
regards,
Admin
. (Type the .[dot] in a new Line and press Enter )
quit

Management via the browser

For management I tent to use webmin (also as I am more or securely behind a firewall ). Installation is straightforward and instructions can be found here: http://www.webmin.com/

If all works this is what it looks like: 

One of the things I really like if the section 'Historic System Statistics' (webmin stats http://webminstats.sourceforge.net/) 


So that's it, hope this is of any use!